This is the last part of the tutorial describing how to configure IdP initiated SSO and Identity Federation with OpenAM and SAML. The tutorial consists of 4 parts:
- Basic concepts & use case overview
- Sample environment configuration with OpenAM
- Using OpenAM SAML services
- Detailed look at SAML interactions
If you don't understand any terms or abbreviations that I use here please read
the first part of the tutorial together with the
Security Assertion Markup Language (SAML) V2.0 Technical Overview.
Detailed look at SAML interactions
At this stage you should have working IdP and SP test environments, both configured using OpenAM. You should also have a sample ProviderDashboard web application that uses SAML functionality exposed by OpenAM. All SAML operations are triggered by hyperlinks placed within that web application that point to specific OpenAM services.
At the end of previous chapter we described steps to verify if our Identity Federation and SSO processes are working correctly. You have probably noticed some browser redirections or page refreshes when performing verification tests. However, you would probably like to know what is exactly happening behind the scenes.
In this chapter I will explain how a browser communicates with the Idp (Identity Provider i.e. ProviderDashboard) and SP (Service Provider i.e. IssueReporter) during SSO and identity federation process. Please note that in my examples I'm using HTTP POST binding for sending assertions. Remember that Artifact binding is also available in OpenAM. For more details about SAML binding please refer to SAML technical overview linked above.
Identify federation and SSO
The following sequence diagram presents communication (happy path) between browser, IDP and SP while performing the SSO with initial identity federation i.e. user requests SP access from IDP for the first time (identities have not been previously linked). All requests names begin with HTTP request type used (GET or POST) and responses names begin with HTTP status code returned.

IdP initial authentication
This part of the flow covers regular authentication procedure for ProviderDashboard, that comes out-of-the-box after we configure an OpenMA agent to protect it. It consists of 4 HTTP requests:
- Unidentified user tries to access a protected resource (Provider dashboard). Agent doesn’t recognize the user so it sends redirection response
- User is redirected to login screen
- User provides their ProviderDashboard credentials (12345) and submits the login form. IdP OpenAM validates provided credentials, create the authentication cookie and redirects the user to protected resource.
- Browser requests protected dashboard, agent recognizes the user and let them through.
SSO initiation
At this stage we have a user authenticated with ProviderDashboard (IdP). Somewhere within the dashboard there is a hyperlink named “Report an issue”, initiating the identity federation and SSO with IssueReporter (SP). The hyperlink points to the idpssoinit endpoint exposed by OpenAM installation used for ProviderDashboard and described in detail in previous chapter.
When the user clicks the described hyperlink OpenAM generates the SAML assertion that will be send to the configured SP. If you would like to see the content of the generated assertion you can check OpenAM logs at:
\openam\debug\Federation
You need to ensure you have set OpenAM Debug level to 'Message' level. All the assertion`s elements are explained in SAML technical overview.
When the SAML assertion is created the idpssoinit endpoint includes it in the HTTP response that is send back to the browser as result of clicking the hyperlink. The response contains an HTML form with a small piece of javascript, that causes the form to be automatically submitted (by POST http request) when browser receives that response. Sample response body can look as follows:
<HTML>
<HEAD>
   Access rights validated
</HEAD>
   <BODY onLoad="document.forms[0].submit()">
</BODY>
</HTML>The following table describes response segments that depend on IDP and SP configuration:
| Segment name |
Description |
| SP_Assertion_Receiver |
Url of an SP endpoint that receives and processes assertions from IDP (Assertion Consumer Service). |
| SAML_response |
Base64 encoded and zip compressed SAML response with the generated SAML assertion. |
| final_desitnation |
Final SP destination as specified in hyperlink. |
Identity federation and SSO
Once Assertion Consumer Service exposed by SP receives an assertion it should establish the federation between identities and perform SSO. The default way of doing this when using OpenAM as the SP consists of following steps:
- Validate the received assertion i.e. check digital signature and specified assertion conditions.
- Extract the persistent identifier from the assertion and search for an SP identity that has this token associated. In our scenario there should be no user found as the federation has not been established yet.
- Remember the persistent identifier and RelayState parameter value and redirect the user to SP login page.
- When the user provides valid credentials save the remembered persistent identifier against that user in SP data store.
- Log that user in using SP`s default authentication mechanism.
- Retrieve the remembered RelayState value and redirect the user to that url.
SSO only
The following sequence diagram presents communication between browser, IDP and SP while performing the SSO for a user that has the identity federation between IdP and SP already established i.e. it is NOT the first time that user requests SP access from IDP.
 SSO initiation
From the IdP perspective the scenario is almost the same as in previous case. After the user has authenticated and clicked the hyperlink IdP generates assertion and posts it to the SP. The only difference is that this time the IdP doesn’t need to generate the persistent identifier, because it has been generated previously.
The assertion will have the same format as the one send in previous scenario. The content of the assertion will also be the same except the attribute values that rely on current date & time e.g. assertion expiration condition
Assertion processing
In this scenario the Assertion Consumer Service exposed by SP that receives the assertion should ensure that the federation between identities has been previously established and then perform SSO. The default way of doing this when using OpenAM as the SP consists of following steps:
- Validate the received assertion i.e. check digital signature and specified assertion conditions.
- Extract the persistent identifier from the assertion and search for an SP identity that has this token associated. In this use case there will be 1 result returned i.e. the user that has been previously linked to the Idp user.
- Log in the found user using SP`s default authentication mechanism.
- Retrieve the RelayState value (url) from request and redirect the user to that url.
Idp Initiated logout
The following sequence diagram presents communication required to perform user logout on IdP and SP.
 SLO initiation
This use case assumes that identity federation has been previously established between IdP and SP and the user is authenticated with ProviderDashboard (IDP) and IssueReporter (via SSO). On ProviderDashboard site there is a logout hyperlink pointing to
IDPSloInit service that initiates Single Log Out process.
When the user clicks that logout hyperlink OpenAM generates SAML logout request that is then sent to IssueReporter by HTTP REDIRECT. The Http response returned for the request generated by clicking the logout link will look as follows:
HTTP/1.1 302 Moved Temporarily
Location: http://?SAMLRequest=&RelayState=
Content-Type: text/html
(...)
The following table describes response segments that depend on IDP and SP configuration:
| Segment name |
Description |
| SP_logout_service |
Url of an SP endpoint that receives and processes logout requests. |
| SAML_response |
Base64 encoded and zip compressed SAML logout request i.e. content of the file attached above. |
| final_desitnation |
Final SP destination as specified in hyperlink. |
SP logout
When the browser receives that response it will redirect the user to SP logout service and pass the logout request. The default request processing on SP side looks as follows:
- Validate the SAML request i.e. check issuer
- Extract the persistent identifier from the logout request and search for an SP identity that has this token associated. In this use case there will be 1 result returned
- Ensure that the found user is currently logged in using SP authentication mechanism e.g. by checking cookies attached to the request by browser
- Logout the user using SP authentication mechanism e.g. delete session and destroy authentication cookies
- Generate logout confirmation response
Logout confirmation
When the logout confirmation is generated the SP logout service sends it back to IdP using again HTTP REDIRECT:
HTTP/1.1 302 Moved Temporarily
Location: http:///IDPSloRedirect/metaAlias/idp?SAMLResponse=&RelayState=
Content-Type: text/html
(...)
#Possible headers destroying auth cookies for SP
The following table describes response segments that depend on IDP and SP configuration:
| Segment name |
Description |
| openam_deployment_url |
Url of OpenAM deployment used in ProviderDashboard |
| logout_response |
Base64 encoded and zip compressed SAML logout response. |
| final_desitnation |
Final SP destination as specified in hyperlink. |
Once Idp OpenAm receives the logout response generated by SP it performs the following steps:
- Check if request Id included in response is correct
- Ensure the status code is “Success”
- Logout currently logged IdP user
- Extract RelayState value from response and redirect user to final destination
Idp Initiated federation termination
The following sequence diagram presents communication between browser, IDP and SP required to terminate the identity federation established previously.
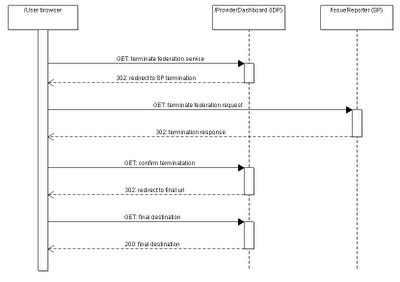
This use case assumes that identity federation has been previously established between IdP and SP and the user is authenticated with ProviderDashboard (IDP). The communication between browser, IdP & SP is exactly the same as in SLO usecase described above, with the main difference being the service used i.e.
IDPMniInit.
SP identity federation termination
On SP side termination consists of following steps:
- Validate the request i.e. check issuer
- Extract the persistent identifier from the request and search for an SP identity that has this token associated. In this use case there will be 1 result returned
- Delete the association between that user and the persistent identifier
- Generate confirmation response
IdP identity federation termination
Once Idp receives the termination confirmation generated by SP it performs the following steps:
- Check if request Id included in response is correct
- Ensure the status code is “Success”
- Retrieve the request data and extract the persistent identifier used
- Terminate association between IdP user and that identifier
- Extract RelayState value from response and redirect user to final destination
Troubleshooting
All use cases described in this chapter rely on Http protocol and communication between user browser and SAML services. If you run into troubles while configuring SAML with OpenAM or just are get interested how all the SAML messages generated by OpenAM look like I would strongly recommend you to start with
this tutorial. It describes developer tools that can be used to trace the browser communication, extract messages etc.
OpenAM Support & consultancy
I did my best to make this OpenAM tutorial as complete as possible, so you can configure SSO and Identity Federation by yourself. Due to very limited amount of free time I'm not able to respond to your questions in comments or emails. However, if you still need additional explanation or your scenario differs from what I described you can hire me for consultancy (
contact me).
Previous chapter: Using OpenAM SAML services


