Friday, 22 June 2012

IdP initiated SSO and Identity Federation with OpenAM and SAML - part III

This is the third part of the tutorial describing how to configure IdP initiated SSO and Identity Federation with OpenAM and SAML. The tutorial consists of 4 parts:
  1. Basic concepts & use case overview
  2. Sample environment configuration with OpenAM
  3. Using OpenAM SAML services
  4. Detailed look at SAML interactions
If you don't understand any terms or abbreviations that I use here please read the first part of the tutorial together with the Security Assertion Markup Language (SAML) V2.0 Technical Overview.

Using OpenAM SAML services

Having IdP and SP environments configured it’s time to make use of the SAML functionality exposed by OpenAM. OpenAM deployment includes several services that allow developers to easily configure the entire Identity Federation and SSO. Those services are available directly at openam base url and can be access by regular hypelinks from within your web applications.

In this chapter I will describe each service and show how to make use of them.

IDPSSOInit - Identity Federation and SSO service

This service is used to initiate both Identity Federation and SSO. If the link is clicked for the first time by current IdP user the Identity Federation process will be invoked and then SSO. Otherwise only SSO process will be invoked.

The service takes following parameters:

Param name Description Sample value
metaAlias IdP MetaAlias value, by default “/idp”. To ensure about the correct value navigate to hosted IdP configuration screen. MetaAlias will be defined in Services tab. /idp
spEntityID Value of the name given to your Service Provider. Usually SP OpenAM url. http://www.sp.com:8090/openam
binding Binding type used for sending SAML assertions. Available Bindings: HTTP-Artifact & HTTP-POST urn:oasis:names:tc:SAML:2.0:bindings:HTTP-POST
RelayState The target URL on SP side. User will be redirected to that url after SSO is completed. http://www.reporter.sp.com:8020/issuereporter

Sample HREF attribute value for the SSO initiation link could look as follows:

http://www.idp.com:8080/openam/idpssoinit
?metaAlias=/idp
&spEntityID= http://www.sp.com/openam
&binding=urn:oasis:names:tc:SAML:2.0:bindings:HTTP-Artifact
&RelayState=http://www.reporter.sp.com:8020/issuereporter

IDPSloInit - Single Log Out

This service is used to initiate Single Logout (SLO). It allows logging out the user from both IdP and SP with a single click.

The service requires following parameters:

Param name Description Sample value
binding Binding type used for logout request. Available Bindings: HTTP-Redirect & SOAP urn:oasis:names:tc:SAML:2.0:bindings:HTTP-Redirect
RelayState The target URL to be used after logout http://www.dashboard.idp.com:8010/providerdashboard/logout

Sample HREF attribute value for the logout link could look as follows:

http://www.idp.com:8080/openam/idpsloinit
?binding=urn:oasis:names:tc:SAML:2.0:bindings:HTTP-Redirect
&RelayState=http://www.dashboard.idp.com:8010/providerdashboard/logout

IDPMniInit - Federation management service

This service can be used to terminate the relation between accounts that was established during initial Identity Federation. After it is invoked Identities will need to be federated again during the next SSO.

The service requires following parameters:

Param name Description Sample value
metaAlias IdP MetaAlias value, by default “/idp”. To ensure about the correct value navigate to hosted IdP configuration screen. MetaAlias will be defined in Services tab. /idp
spEntityID Value of the name given to your Service Provider. Usually SP OpenAM url. http://www.sp.com:8090/openam
binding Binding type used for termination request. Available Bindings: HTTP-Redirect & SOAP urn:oasis:names:tc:SAML:2.0:bindings:HTTP-Redirect
RelayState The target URL to be used after termination is completed http://www.dashboard.idp.com:8010/providerdashboard
requestType In order to terminate the relation use “Terminate”. The service also supports “NewID” but it is not explicitly used in our use case. Terminate

Sample HREF attribute value for the federation termination link could look as follows:

http://www.idp.com:8080/openam/idpmniinit
?metaAlias=/idp
&spEntityID= http://www.sp.com/openam
&binding=urn:oasis:names:tc:SAML:2.0:bindings:HTTP-Redirect
&RelayState=http://www.dashboard.idp.com:8010/providerdashboard
&requestType=Terminate

How to use OpenAM SAML services?

As mentioned before, all you have to do to use OpenAM SAML services is to create hyperlinks within your web applicaiton pointing to them. In our use case the body of a sample web page for ProviderDashboard could look as follows:

Provider Dashboard

Report an issue Terminate federation Logout
The page above contains 3 hyperlinks:
  1. Report an issue - initiates Identity Federation and SSO with IssueReporter
  2. Terminate federation - terminates Identi Federation established with IssueReporter app. Will only work if the federation has been previously established, otherwise it will cause an error
  3. Logout - initiates logout from both ProviderDashboard and IssueReporter
Copy the hyperlinks and place them anywhere within you sample ProviderDashboard web application. Now it's time to verify if our solution works.

Solution verification

Identity Federation
  1. Navigate to http://www.dashboard.idp.com:8010/providerdashboard
  2. Log in as user '12345'
  3. Click on the 'Report an issue' link
  4. Because you are doing this for the first time you will be redirected to IssueReporter login screen.
  5. Login to IssueReporter using 'filip' account. OpenAM will establish federation between IdP and SP accounts (i.e. between users '12345' and 'filip).
  6. You should be redirected to your IssueReporter app
Single Logout
  1. Go back to http://www.dashboard.idp.com:8010/providerdashboard
  2. Click the 'Logout' link
  3. You should be redirected to IdP OpenAM login screen
  4. Try to access http://www.reporter.sp.com:8020/issuereporter
  5. You should be redirected to SP OpenAM login screen
Federation termination
  1. Navigate to http://www.dashboard.idp.com:8010/providerdashboard
  2. Log in as user '12345'
  3. Click on the 'Terminate Federation' link
  4. Click on the 'Report an issue' link
  5. Because you terminated the original federation you will be redirected to IssueReporter login screen so you can establish new federation.
  6. Login to IssueReporter using 'filip' account to recreate the original federation. OpenAM will establish federation between IdP and SP accounts again (i.e. between users '12345' and 'filip).
  7. You should be redirected to your IssueReporter app
Congratulations! You have now configured working example of IdP initiated SSO and Identity Federation with OpenAM and SAML. But are you really sure what is goin on behind the scenes? In the next chapter I will explain the SAML communication and messages exchanged between IdP and SP in details.

Previous chapter: Sample environment configuration with OpenAM
Next chapter: Detailed look at SAML interactions

Thursday, 21 June 2012

IdP initiated SSO and Identity Federation with OpenAM and SAML - part II

This is the second part of the tutorial describing how to configure IdP initiated SSO and Identity Federation with OpenAM and SAML. The tutorial consists of 4 parts:
  1. Basic concepts & use case overview
  2. Sample environment configuration with OpenAM
  3. Using OpenAM SAML services
  4. Detailed look at SAML interactions
If you don't understand any terms or abbreviations that I use here please read the first part of the tutorial together with the Security Assertion Markup Language (SAML) V2.0 Technical Overview.

Sample environment configuration with OpenAM

Now that you know what we will try to achieve in this tutorial let's try to configure our test environment.

Prerequisites

Web containers
Our test environment will consists of 2 instances of OpenAM, each protecting one web application. The first instance will act as an Identity Provider (IdP) and the second as a Service Provider (SP). This gives us 4 web containers (I used Tomcats 6.x) that I've installed on a single machine using different ports :
  • 8010 - tomcat hosting sample ProviderDashboard application
  • 8020 - tomcat hosting sample IssueReporter application
  • 8080 - tomcat hosting OpenAM protecting ProviderDashboard and acting as IdP
  • 8090 - tomcat hosting OpenAM protecting IssueReporter and acting as SP
OpenAM default configuration
In this tutorial I assume you already have all those tomcats prepared. This means you have some sample applications deployed that represent ProviderDashboard and IssueReporter web applications. Those webapps should also be protected by OpenAM agents communicating with appropriate OpenAM instance. However, at this stage there is no SSO or identity federation configured for those instances (that is what we need to do).

If you don't know how to deploy OpenAM please reffer to the following guide: How to deploy OpenAM.
For now, as ProviderDashboard and IssueReporter you can use any Hello World wabapp. When configuring OpenAM agents please create a realm called "test", as this is what we'll be using in this tutorial.

In your OpenAM instances you should also have registered users, that we use in our use case. This means in IdP OpenAm you should have a user "12345" and in SP there should be a user "filip".

Hosts
My hosts file has 4 different host names set all pointing to 127.0.0.1, so I can access all of the tomcats using different hosts names. The following table summarizes urls I use in this tutorial:

App Url Openam Url Description
http://www.dashboard.idp.com:8010/providerdashboard http://www.idp.com:8080/openam ProviderDashboard application and OpenAM instance protecting it
http://www.reporter.sp.com:8020/issuereporter http://www.sp.com:8090/openam IssueReporter application and OpenAM instance protecting it

If you are using Windows you can configure those hosts by adding the following line to the file
C:\Windows\System32\drivers\etc\hosts
127.0.0.1 www.dashboard.idp.com www.reporter.sp.com www.idp.com www.sp.com

Once you have all the prerequisites fulfilled you can start configuring your SAML communication. This requires configuration changes in both OpenAM instances.

Hosted Identity Provider

First, we will start by configuring hosted Idp in ProviderDashboard OpenAM
  1. Navigate to http://www.idp.com:8080/openam
  2. Login as amadmin to OpenAM web console
  3. On the main screen (“Common tasks” tab) choose “Create Hosted Identity Provider” link from “Create SAMLv2 Providers” section
  4. The following form appears:
    The fields to be populate are marked with red numbers
  5. Populate the form:
    1. Realm
      Select the 'test' realm. Each IdP is directly related to a Realm.
    2. Name – unique name of your IdP
      You can use OpenAM instance url as the name assuming you will only have 1 IdP per instance. If you want to have more IdPs per OpenAM instance use realm names
    3. Signing key
      If you want to digitally sign all your SAML messages select a signing key. OpenAM offers a test key to be used for testing purposes. For production needs you’ll have to generate a new one.
    4. Circle of trust
      Provide name for your circle of trust. All SAML providers that want to communicate with each other need to belong to the same circle of trust.
    5. Attribute mapping
      If IdP and SP identity stores have different schema but store the same kind of information you can define an explicit mapping between them. E.g. Email address can be stored in IdP as ‘email’ and in SP as ‘mailAddress’. OpenAM suggest you attributes available for your IdP.
  6. Click ‘Configure’ button
  7. On the confirmation screen click ‘Finish’

Remote Identity Provider

Next, we will register IdP created in previous step as a remote IdP in IssueReporter OpenAM:
  1. Navigate to http://www.sp.com:8090/openam
  2. Login as amadmin to SP OpenAM web console
  3. On the main screen (“Common tasks” tab) choose “Register Remote Identity Provider” link from “Create SAMLv2 Providers” section
  4. Populate the form:
    • Url of metadata
      Use the following format: http://<idp-openam-url>/saml2/jsp/exportmetadata.jsp
    • Circle of Trust
      Provide the same name as used on IdP side
  5. Click ‘Configure’ button

Hosted Service Provider

Now, it is time to configure an SP hosted in IssueReportr OpenAM:
  1. Navigate to http://www.sp.com:8090/openam
  2. Login as amadmin to SP OpenAM web console
  3. On the main screen (“Common tasks” tab) choose “Create Hosted Service Provider” link from “Create SAMLv2 Providers” section
  4. Populate the form:
    • Name – use url of this SP OpenAM instance
    • Circle of Trust – select the same one as for IdP
    • Use default attribute mapping from Identity Provider - checked
  5. Click ‘Configure’ button

Remote Service Provider

Next, we will register remote SP in ProviderDashboard OpenAM
  1. Navigate to http://www.idp.com:8080/openam
  2. Login as amadmin to OpenAM web console
  3. On the main screen (“Common tasks” tab) choose “Register Remote Service Provider” link from “Create SAMLv2 Providers” section
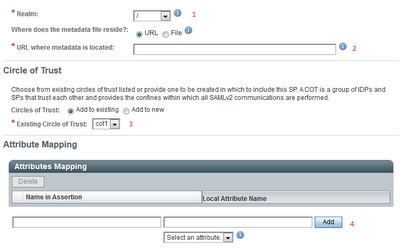
  4. The following form appears:
  5. Populate the form:
    1. Realm
      Select the same realm as for IdP.
    2. Url of metadata
      If another instance of OpenAM is used as SP then the url pointing to the service metadata has following format: http://<sp-openam-url>/saml2/jsp/exportmetadata.jsp
      In our case it is: http://www.sp.com:8090/openam/saml2/jsp/exportmetadata.jsp
    3. Circle of trust
      Select the same as used for IdP
    4. Attribute mapping
      If required use the same mappings as in IdP
  6. Click ‘Configure’ button

General configuration

You can always edit providers defined in previous steps. To do that:
  1. Navigate to either SP or IdP OpenAM and login as admin to OpenAM web console
  2. Click on ‘Federation’ tab
  3. You should see the screen listing all defined circles of trust and all entities (IdPs and SPs). Sample sreen for IdP OpenAM instance:
  4. Click on the entity you’d like to update e.g. hosted IdP
  5. You will be redirected to the screen where you can update default and advanced entity configuration

Environment setup validation

At this stage our test environment should be ready to perform SAML Identity Federation and Single Sign On between our sample ProviderDashboard and IssueReporter applications. In order to validate the setup perform following steps:
  1. Navigate to http://www.idp.com:8080/openam
  2. Login as amadmin to OpenAM web console
  3. On the main screen (“Common tasks” tab) choose “Test Federation Connectivity”
  4. Select circle of Trust (COT) that you'd like to test
  5. The following screen should appear:
    You can select IdP and SP that you'd like to perform the test for and click 'Start Test' button
  6. A warning will be displayed that the user will be logged out - click 'OK'
  7. Now the actual test begins. It consists of following steps:
    1. Authentication for Identity Provider, http://www.idp.com:8080/openam
    2. Authentication for Service Provider. http://www.sp.com:8090/openam
    3. Testing for the ability to link account
    4. Testing for single logout
    5. Testing Single Sign On.
    6. Testing for account termination
    You will be guided through the entire test. While testing account linking you will be asked to provide credentials for the Idp (12345/password) and then for the SP (filip/password). Next it will perform SSO test which requires authentication with Idp credentials once again. At the end of the test you should see a success message.
If everything worked fine you should be able to start using SAML functionality exposed by OpenAM in your applications. Please note that although your test environment is correctly configured the sample web applications are not making use of SAML features yet.

In the next chapter I will show how to make use of SAML features exposed by OpenAM in your web applications.

Previous chapter: Basic concepts & use case overview
Next chapter: Using OpenAM SAML services

Wednesday, 20 June 2012

Add-PSSnapin : Cannot load Windows PowerShell snap-in (...) This assembly is built by a runtime newer than the currently loaded runtime and cannot be loaded.

Lately I've been working on custom Powershell Cmdlets. I created my custom Snapin, installed it using InstallUtil and then tried to execute Add-PSSnapin. Unfortunetally I got the following error:

Add-PSSnapin : Cannot load Windows PowerShell snap-in because of the following error: Could not load file or assembly or one of its dependencies. This assembly is built by a runtime newer than the currently loaded runtime and cannot be loaded.

Solution

This may happen if you work on your Cmdlets on 64 bit Windows, like I did. To solve that create a file called powershell.exe.config with the following content:


Place the file in the Powershell folder, close and reopen PS console and you are ready to go. The location of Powershell folder differs, depending if you want to use 32 or 64 bit version:
32 bit - %windir%\System32\WindowsPowerShell\V1.0 
64 bit - %windir%\Syswow64\WindowsPowerShell\V1.0

Monday, 18 June 2012

IdP initiated SSO and Identity Federation with OpenAM and SAML - part I

In this tutorial I will describe how to configure IdP initiated SSO and Identity Federation with OpenAM and SAML. The tutorial consists of 4 parts:
  1. Basic concepts & use case overview
  2. Sample environment configuration with OpenAM
  3. Using OpenAM SAML services
  4. Detailed look at SAML interactions

Basic concepts

In this section I will describe basic concepts and terms used in this tutorials. It is important that you understand them before you start configuring the end solution.

OpenAM

OpenAM is Access Manager that evolved from OpenSSO after SUN abandoned it. It provides open source Authentication, Authorization, Entitlement and Federation software. This tutorial assumes you have basic knowledge about OpenAM and the functionalities it offers. You should be able to deploy and initially configure OpenAM instance on you local machine (not covered in this tutorial).

More on OpenAM on their website: http://www.forgerock.com/openam.html.

SAML

Security Assertion Markup Language (SAML) standard defines an XML-based framework for describing and exchanging security information between on-line business partners. Currently OpenAM supports SAML in version 2. The best way to start learning about SAML v2 is the Security Assertion Markup Language (SAML) V2.0 Technical Overview. This document covers all the following basic concepts described in my tutorial.

Web Single Sign On

Web SSO is the approach allowing single sign on for multiple web applications that have established a common agreement on how to exchange user information. The end users provide their credentials only once and they are recognized by all of the webapps, even if they are deployed in different domains and use different identity stores. SSO also allows usage of single identity store by all of the webapps.

Identity Federation

Identity federation is a process of linking users defined in different identity stores. Such link allows implementation of Single Sign On. What is important from privacy perspective is that in order to establish federation both parties do not have to know anything about user attributes from different identity stores.

Use case overview

This section describes the use case we will try to implement in this tutorial. I believe in learning by example so let's describe our use case using one:

I've recently registered a new internet domain by one of online providers. The provider offers a web based customer dashboard - let's call it the ProviderDashboard. I can use my customer number (12345) and password to log into that dashboard to see the list of my domains, invoices etc.

My provider has also an agreement with an external web application that offers reporting technical issues (e.g. when the domain is not available) - let's call it the IssueReporter. I already have an existing account at that website, because I used it in the past for other reasons. My login for that website is "filip".

So, whenever I log into the ProviderDashboard I have a link called "Report an issue" that takes me directly to the IssueReporter app. After I click the link I'm automatically loged into the IssueReporter app using the correct username i.e. filip. However, this relation is not symetricall - if I log in directly into IssueReporter I will not be automatically loged into ProviderDashboard.

So, let's have a look at the use case flow in detailed steps (happy path):

  1. I log into ProviderDashboard using account number 12345 and password
  2. I click on the link within the dashboard called "Report an issue"
  3. I'm redirected redirected to IssueReporter login screen
  4. I provide valid IssueReporter credentials i.e. filip as username
  5. My ProviderDashboard account (with identifier 12345) is linked to IssueReporter account for filip
  6. I am redirected to IssueReporter application and automatically logged in using filip account
Important: steps described using green font only happen during the first time I click on the link and belong to Identity Federation process. All subsequent redirections from ProviderDashboard to IssueReporter will not require those to be completed. All remaining steps are part of usual SSO process.

SAML terminology

In the scenario described above ProviderDashboard application acts as an Identity Provider (IdP) whereas the IssueReporter acts as Service Provider (SP). IdP and SP are terms defined in SAML and OpenAM also use them.

Our use case reflects “IdP initated SSO” scenario described in details in SAML Technical Overview document linked earlier. In general: IdP produces assertions about the user identity and passes them to SP. IdP also initiates Identity Federation when required i.e. when the link is clicked for the first time.

The following diagram presents IdP initiated SSO. It doesn’t cover Identity Federation actions (assume identities are already federated):

Note: On the diagram SAML assertions about identity are passed from IdP to SP using http POST request (steps 4&5). It is also possible to use SAML artifacts instead. When using SAML artifacts IdP passes to SP only artifact id instead of the entire identity assertion. SP obtains then the assertion by making a SOAP call to IdP and passing the artefact id.

In the next part of this tutorial I will describe how to configure sample environments using OpenAM for both IdP and SP.

Next: Sample environment configuration with OpenAM

Can't connect remotly to Sql Server 2008 R2

By default, after the installation of Sql Server 2008 R2 remote access to database server is disabled and you can only access it locally. In order to change that open Sql Server Configuration Manager, expand "Sql Server Network configuration" node, select server instance (default is MSSQLSERVER) and check the status for TCP/IP:


In order to alow remote access double click on entry for TCP/IP protocol and change the value of "Enabled" property to "true". Save your changes and restart the service.